When we get a wild hair to do something aesthetic around the shop, we want it done big. Sometimes ‘big’ refers to something that seems small but ends up being a much larger project (mainly because of our demand for things to be near perfect- and ‘perfect’ who knows what that is on any given day), or in this case, ‘big’ simply refers to the size of its finished size.
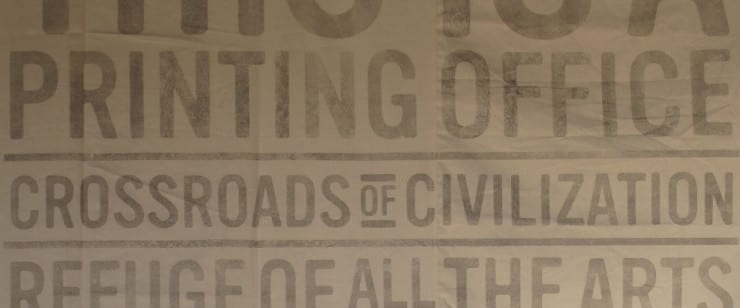
We wanted people to know what they were getting into when walking through the front door. So, what better than a 15’x10′ sign? I’ll tell you: a 15’x10′ solvent transfer sign with an awesome Beatrice Warde quotation, that’s what. We figured we’d let you in on how we did it – sort of. Sort of, only because we might be leaving out some details, but you’ll get the gist.
You’ll need:
- Canvas surface
- Acetone
- Toner-based print out – we built our file, to scale, in Illustrator and separated it in artboards to sizes the big roll printer at Kinkos could handle.
- Latex gloves– do NOT use nitrile, acetone will melt them. Yes, we found this out accidentally and one of us will become intolerant of solvents in the near future. Which also reminds us to remind you all of how dangerous handling solvents without protection is. Or, perhaps it could go full circle and you’ll find yourself casually standing downwind at the gas pump and if that’s the gateway to paint huffing, not wearing gloves is second base. And, we’ve all seen those episodes of COPS with the paint huffers.
- Brayer– We used a brayer to really get the ink to transfer from the printout to the canvas. However, something that you can find that will apply pressure and roll along will work too. We did some troubleshooting with this and we started with using jars and rolling them, but we couldn’t get the pressure right over such a large surface. We’ve used spoons with smaller jobs, to give you an idea.
- Ruler
- Rags
- Masking or Painter’s Tape
- Pen or pencil
- Friends
What You’ll Do:
- When designing your printout, make sure that you reflect it in the end so that the image will transfer with the correct orientation. This is imperative with text, unless you want the whole thing to be only legible in a mirror, which, we’re assuming is not the case.
- Layout your canvas. You might want to place something for the canvas to press into underneath, especially if you’re working on a hard surface. This will also prevent slippage. Line up and tape your printout to the canvas.
- Apply acetone to rag and rub into the paper.
- If you’re doing a large transfer, like ours, you will most likely need a 3rd person to smooth out the printout as you go so that it doesn’t wrinkle or kink along the way.
- Quickly have someone trace your steps with the brayer or rolling apparatus to ensure that the ink transfers to the canvas.
- And repeat! Et voilá!
Also, we set up a stop motion video for your enjoyment:
XL solvent transfer from The Mandate Press on Vimeo.
XL solvent transfer from The Mandate Press on Vimeo.